How to Build a Customizable FAQs page using section in Shopify

FAQ or Frequently Asked Questions is a very common page, needed in every store. In many paid Shopify theme, we have already had this page enable. But almost of them does not have. Today, in this tutorial, I am going to show you how to build a FAQs page using section in Shopify without any app.

Every part in this page will be controlled via Shopify page section which is most customizable and easy to edit to customer.
There are alots of style for FAQs page, but today I just show you a simple layout. I’ll intruduce to you new layouts in another article. Let’s start to do this
How to Build a Customizable FAQs page using section in Shopify
1. Adding new page template and include it
From Shopify Dashboard, navigate to your Theme editor

Add new page template with name ecg_faq
After adding a new page template in Shopify, default **page.liquid **template will be duplicated as new page template content. In recently created page template, find for {{ page.content }}, add this line right bellow it:
{%- section 'page-faq-template' -%}Just like this screenshot below

2. Adding new section
From left theme editor sidebar, click on Add a new section, enter name page-faq-template and hit Create section

Add the following code to newly created section template and Save
<div class="shopify_explorer__content">
  {%- assign expand_questions = section.settings.expand_questions -%}

  {%- for block in section.blocks -%}
    {%- case block.type -%}
      {%- when 'separator' -%}
        <h3 class="shopify_explorer_faq__separator h3" {{ block.shopify_attributes }}>{{ block.settings.title | escape }}</h3>

      {%- when 'question' -%}
        <div class="shopify_explorer_faq__item {% unless expand_questions %}shopify_explorer_faq__item--expandable{% endunless %}" {{ block.shopify_attributes }}>
          <h3 class="shopify_explorer_faq__question h5 {% unless expand_questions %}link{% endunless %}">{{ block.settings.title }}</h3>
          <div class="shopify_explorer_faq__answer rte">
            {{ block.settings.answer }}
          </div>
        </div>
    {%- endcase -%}
  {%- endfor -%}
</div>
{% schema %}
  {
    "name": "FAQs",
    "settings": [
      {
        "type": "checkbox",
        "id": "expand_questions",
        "label": "Expand all questions by default",
        "default": false
      }
  ],
    "blocks": [
      {
        "type": "separator",
        "name": "Section separator",
        "settings": [
          {
            "type": "text",
            "id": "title",
            "label": "Heading"
          }
        ]
      },
      {
        "type": "question",
        "name": "Question",
        "settings": [
          {
            "type": "text",
            "id": "title",
            "label": "Question"
          },
          {
            "type": "richtext",
            "id": "answer",
            "label": "Answer"
          }
        ]
      }
    ]
  }
{% endschema %}

{% stylesheet %}
{% endstylesheet %}

{% javascript %}
(function() {
  $('body').on('click', '.shopify_explorer_faq__question', function() {
    $(this).next('.shopify_explorer_faq__answer').slideToggle(150).toggleClass('active');
    $(this).toggleClass('active');
  });

  $(document).on('shopify:block:select', '#shopify-section-page-shopify_explorer_faq-template', function(event) {
    $(event.target).find('.shopify_explorer_faq__answer').slideDown(150);
  });

  $(document).on('shopify:block:deselect', '#shopify-section-page-shopify_explorer_faq-template', function(event) {
    $(event.target).find('.shopify_explorer_faq__answer').slideUp(150);
  });
}());
{% endjavascript %}
This is the heart of this page, it will generate blocks for back-end section and generate HTML for front-end page.
3. Adding style
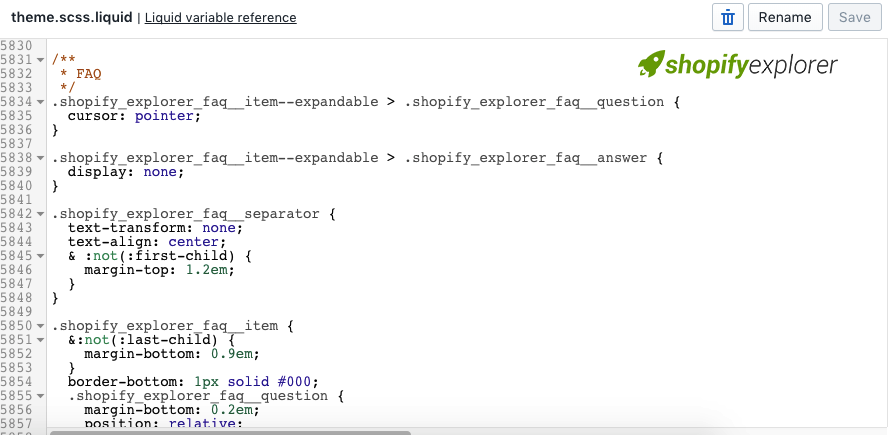
To make these code works and page look cleaner and more beautiful. We need to add some more style for it. Place the following code into your style file. It can be theme.scss, theme.css, styles.scss, styles.css,…
If your theme use SCSS, please use this code:
/**
 * FAQ
 */
.shopify_explorer_faq__item--expandable > .shopify_explorer_faq__question {
  cursor: pointer;
}

.shopify_explorer_faq__item--expandable > .shopify_explorer_faq__answer {
  display: none;
}

.shopify_explorer_faq__separator {
  text-transform: none;
  text-align: center;
  & :not(:first-child) {
    margin-top: 1.2em;
  }
}

.shopify_explorer_faq__item {
  &:not(:last-child) {
    margin-bottom: 0.9em;
  }
  border-bottom: 1px solid #000;
  .shopify_explorer_faq__question {
    margin-bottom: 0.2em;
    position: relative;
    padding: 5px 15px;
    padding-right: 30px;
    margin: 0;
    &.active::before {
      -webkit-transform: rotate(-135deg);
      -ms-transform: rotate(-135deg);
      transform: rotate(-135deg);
    }
  }
  .shopify_explorer_faq__answer {
  	padding: 5px 15px;
    &.active {
      border-top: 1px solid #000;
    }
  }
  .shopify_explorer_faq__question::before {
    position: absolute;
    right: 0;
    border-bottom: 1px solid #000;
    border-right: 1px solid #000;
    content: '';
    display: block;
    height: 12px;
    margin-top: -11px;
    pointer-events: none;
    position: absolute;
    right: 12px;
    top: 50%;
    -webkit-transform-origin: 66% 66%;
    -ms-transform-origin: 66% 66%;
    transform-origin: 66% 66%;
    -webkit-transform: rotate(45deg);
    -ms-transform: rotate(45deg);
    transform: rotate(45deg);
    -webkit-transition: all 0.15s ease-in-out;
    transition: all 0.15s ease-in-out;
    width: 12px;
    @media(max-width: 590px) {
      width: 8px;
      height: 8px;
      margin-top: -7px;
      right: 3px;
    }
  }
}
If your theme use CSS, please use this code:
/**
 * FAQ
 */
.shopify_explorer_faq__item--expandable > .shopify_explorer_faq__question {
  cursor: pointer;
}

.shopify_explorer_faq__item--expandable > .shopify_explorer_faq__answer {
  display: none;
}

.shopify_explorer_faq__separator {
  text-transform: none;
  text-align: center;
}
.shopify_explorer_faq__separator :not(:first-child) {
  margin-top: 1.2em;
}

.shopify_explorer_faq__item {
  border-bottom: 1px solid #000;
}
.shopify_explorer_faq__item:not(:last-child) {
  margin-bottom: 0.9em;
}
.shopify_explorer_faq__item .shopify_explorer_faq__question {
  margin-bottom: 0.2em;
  position: relative;
  padding: 5px 15px;
  padding-right: 30px;
  margin: 0;
}
.shopify_explorer_faq__item .shopify_explorer_faq__question.active::before {
  -webkit-transform: rotate(-135deg);
  -ms-transform: rotate(-135deg);
  transform: rotate(-135deg);
}
.shopify_explorer_faq__item .shopify_explorer_faq__answer {
  padding: 5px 15px;
}
.shopify_explorer_faq__item .shopify_explorer_faq__answer.active {
  border-top: 1px solid #000;
}
.shopify_explorer_faq__item .shopify_explorer_faq__question::before {
  position: absolute;
  right: 0;
  border-bottom: 1px solid #000;
  border-right: 1px solid #000;
  content: '';
  display: block;
  height: 12px;
  margin-top: -11px;
  pointer-events: none;
  position: absolute;
  right: 12px;
  top: 50%;
  -webkit-transform-origin: 66% 66%;
  -ms-transform-origin: 66% 66%;
  transform-origin: 66% 66%;
  -webkit-transform: rotate(45deg);
  -ms-transform: rotate(45deg);
  transform: rotate(45deg);
  -webkit-transition: all 0.15s ease-in-out;
  transition: all 0.15s ease-in-out;
  width: 12px;
}
@media (max-width: 590px) {
  .shopify_explorer_faq__item .shopify_explorer_faq__question::before {
    width: 8px;
    height: 8px;
    margin-top: -7px;
    right: 3px;
  }
}
Save your style for code to affect.
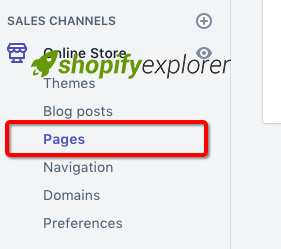
4. Adding new page
From Shopify admin left sidebar, navigate to Online Store > Pages
Hit on **Add **page on top right position

New page form will appear, please fill in Page title and **Template suffix **(must select page.ecg_faq), hit **Save **to create new page

5. Add page content
Come back to theme editor, hit on Customize

After theme editor finish loading, select the recently created page. In my case, it’s FAQs

Wait for new page finish loading, select **FAQs **from the left side editor. A new panel will appear, here you can add **Separator **or Question

Here you can easily build your FAQs page, add/remove headline, question or edit question/answer.
They are all dead easy.
Conclusion
Hope that my tutorial help you a bit in launching a new store. Please share if you like this article and don’t forget to hit ads to helps me maintain this site. Thank you